Personalised Christmas Cards 2017

Wednesday 26 November 2014

Keep Calm and Count Down To Christmas


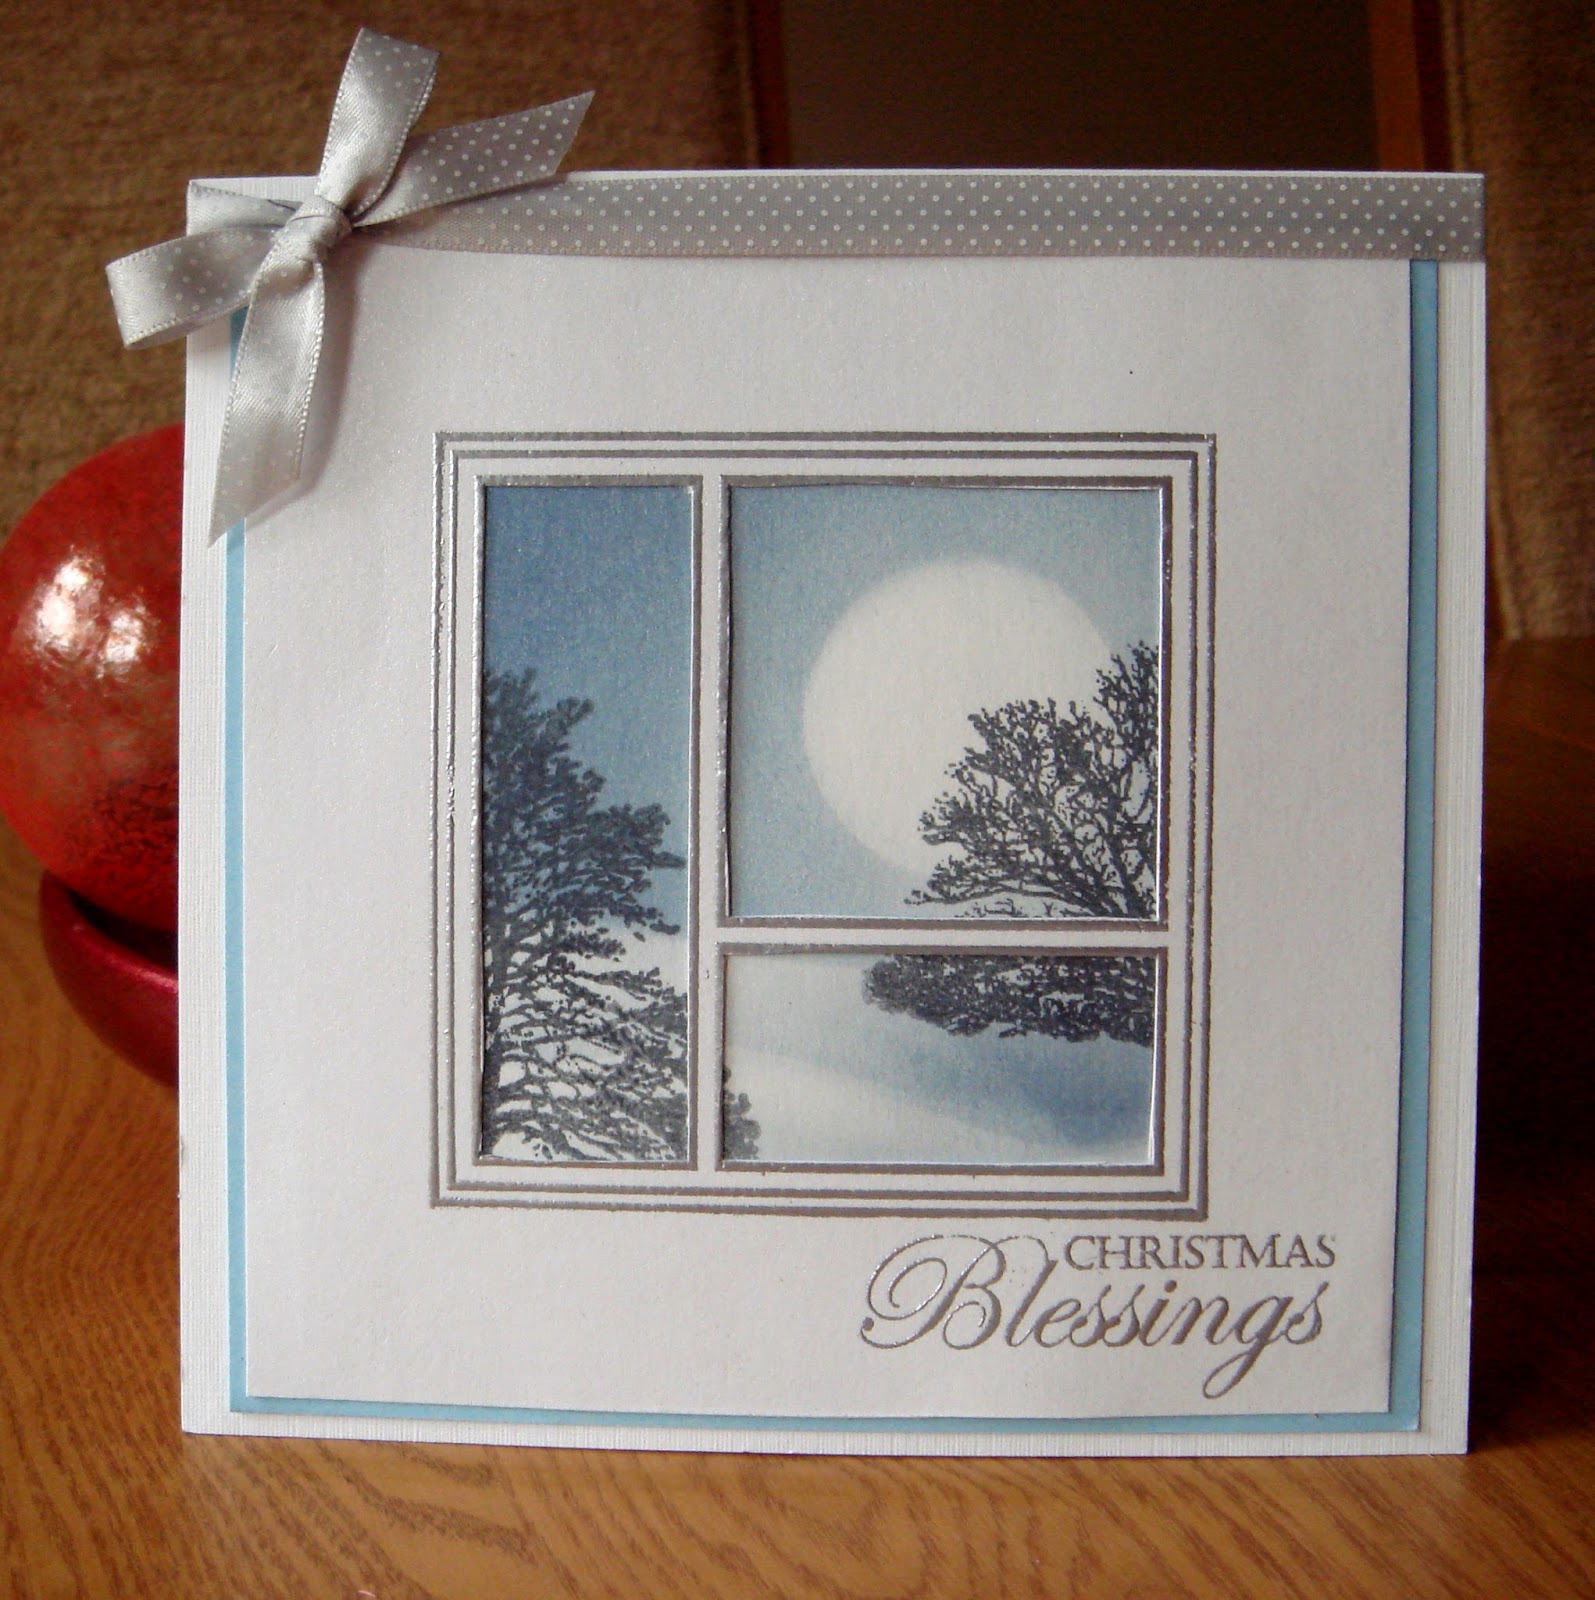
Good morning everyone, I missed the last two special offer from Papermilldirect so hope you all got your newsletters with the offers, if you are not signed up for the newsletter you can find the sign up here.  This week's special offer is a gorgeous A4 shiny blue 270gsm card, the pearlised paper and the A4 white 250gsm smooth card from the last two offers is still available too .

I used this week's shiny blue card and a selection of Papermilldirect coloured cards to make these framed Christmas gifts for family and friends.


Here is a Christmas card using a red, teal and orange colour theme, again using Papermilldirect coloured card.


A square of smooth white card was coloured using distress inks and a Memory Box stencil, when dry the greeting was stamped onto the card and a ribbon tied round it.  The white card was layered onto teal and red card and added to a white card blank.  The tree (Indigo Blu freebie) was stamped, coloured slightly with teal ink and dotted with glitter, this was then added to the card with sticky fixers.


Pearlised paper was used to create the beard and white trimmings on this jolly Santa count down to Christmas calendar which I made for my granddaughter.

Check out the other Papermill Design Team member's blogs to see what they have been up to this week:

Thursday 13 November 2014

Holly and Ivy Christmas Wreath


Good afternoon friends, followers and anyone passing by, I'm here today with another Christmas card and a reminder that this month's challenge over at Oak House Studio is "Winter", an ideal opportunity to get those Christmas cards started and enter the challenge too.


I have been playing with the Oak House Studio  Christmas wreath stamp set. My wreath was stamped onto a cut out circle using the individual stamps in this set, then cut out with a craft knife before mounting onto my card.  The branches were lightly stamped round the edge and the leaves added to form the wreath, the berries were created  using the poinsettia center from the bumper winter leaves stamp set. The sentiment was stamped in the center of the wreath and a red ribbon added to finish the card.  I used Oak House Studio pigment inks which were added to the stamps then sprayed with a fine mist of water.

This is a fabulous set for stamping your Christmas/winter projects and there are many more Christmas stamps in the Oak House Shop.  Looking forward to seeing your winter cards and projects entered into this month's challenge,  check out the facebook page for more details and where you can add your challenge entry to the photo folder for this month's challenge,  there is a prize on offer too.

Monday 10 November 2014

Snowflake Starburt


Hope you are all enjoyed your weekend, I have been playing with ideas for a card for the Craft Stamper Take It Make It Challenge.  The challenge is to create a Christmas card using a non Christmas stamp,  here is my snowflake card made using a stamp from Oak House Studio  called iron border  to create a snowflake starburst.


The whole stamp was used for the longer branches of the snowflake and the shorter ones using the lover edge of the stamp.  The snowflake was stamped and embossed with silver detail embossing powder, a snowflake from the Snowflake Collection was stamped and embossed onto a circle of card which was added to the center and white pearls were added to the snowflake.  The card was lightly sprayed with Silver Pearl spray ink to make the background look snowy.  Finally the greeting from the sending you peace and joy stamp set  was added to the card and the insert,  

All stamps and inks are from Oak House Studio and card used from Papermill Direct.  Check out the Craft Stamper challenge here you have until 27th November to enter.

Hope you like my snowflake starburst, I certainly enjoyed making it.

Thursday 6 November 2014

Snow and Sparkle For Christmas


Good morning friends, followers and passers by and a big welcome to Teighan who joined my followers recently.  It has been a long time since I entered any challenges and the Lavinia Stamps "Snow and Sparkle"challenge caught my eye this week.  I have recently brought out the ink dusters I bought years ago and have been making cards with background scenes, Lavinia stamps lend themselves to such backgrounds so here is what I came up with.


To achieve the background a square was masked on a piece of smooth white card using masking tape.  Using the brushes, pigment inks and a torn piece of paper the hills and snowy peaks were coloured onto the masked area.   The  "Fleur" stamp was stamped in black and coloured with pigment inks, the sentiment was stamped and silver embossed then added to the background.  Navy, pale blue and the background card were layered onto a white card blank, glitter was added to the hills, the background was sprayed with silver pearl Colour Chemistry ink and splats of white paint to make the snow.

All card used from Papermilldirect, Inks, embossing powder and sentiment are from Oak House Studio and the fabulous  "Fleur" stamp from Lavinia Stamps.


Monday 3 November 2014

Snowflakes and Christmas Greetings


How the months have flown by this year and Christmas will soon be upon us.  I hope you have all managed to get those Christmas cards made, if not this month's challenge over at Oak House Studio will hopefully inspire you to make a few.  The theme is "Winter", Christmas cards, snowflakes, holly and ivy all come to mind so check out the challenge on the Inkspired By Oak House Studio Facebook page and let us see your Winter cards entered into the challenge.


Here I have a kraft card with blue and white using Oak House Studio snowflake collection stamps and sentiment.  The snowflake collection snowflakes were stamped onto the blank kraft card in powder blue pigment ink, an oblong of white card was masked and snowflakes stamped and embossed with white embossing powder the background was then coloured using powder blue pigment ink and an ink duster.  The sentiment was stamped in blue and three layered tags, kraft, blue and white, were tied with string and a button.  All elements were layered onto the kraft card, a die cut snowflake added and some sequins for sparkle.

We would love to see your cards in the challenge, there are prizes and the challenge runs until the end of the month.  Pop over to the facebook page and put your challenge entry in the folder in the photos section, and check out Oak House Studio's blog for more inspiration from the design team throughout the month.

Friday 31 October 2014

More Halloween Cards


Happy Halloween everyone, a short post today with another two Halloween cards, these were made to order so I could not post them in my previous blog post as you never know who may pop in to check what I have been up to. 

Check out this week's offer at Papermilldirect, a beautiful primrose yellow card, the black is still on offer too.

A4 Primrose Yellow 240gsm Card
Small Box £5.50


Papermilldirect  ivory linen, smooth white and black card. Background coloured with distress inks, images from the Silhouette Store and SVG Cuts.


Edgar Allen Poe inspired card - The Raven. Papermilldirect Black card used for base and smooth white for stamping. Stamps by Stampers Anonymous and Indigo Blu, distress inks and paper by My Mind's Eye, "Haunted" by Carina Gardner.


Have a spooktacular night if you are celebrating Halloween, if not just have a great evening xx

Thursday 23 October 2014

Blue Moon - Through The Square Window


Hi everyone, today I have a Christmas card made with the Oak House Studio Block Frame (the empty version of the Christmas Frame) which I cut out and used as a window looking out onto a nighttime winter scene.  The empty block frame is so versatile, cut out the panels to create a window as I have done,  fill the boxes with designs, or cut out the panels and outer frame for reconstructing when stamped.


I used the bolck frame, Christmas blessings sentiment  and the tree beech and tree oak stamps for my card, and here is how it was put together.  Start by stamping and embossing the frame with detailed embossing powder onto a fairly large piece of card.  Cut your piece of card to fit your card blank before you cut out the panels in the frame to make your window,  use a sharp craft knife to get a clean cut.

Create your inky scene onto a separate piece card.  Place a circle of paper where you want the moon and colour your background with inks, I used distress ink and a blending brush,  Oak House Studio pigment inks work wonderfully too.  The trees were added to the scene using slate grey pigment ink. I added the frame to the scene panel and placed this over a co-ordinating piece of card using 3D sticky fixers.

This card is easier than it looks, you can draw or ink the background scene, or use stamps and die cuts the choice is yours.  We would love to see what you come up with, don't forget the Oak House Studio challenge for frames and borders is open until the end of the month so there is still time to get your entries in.  Pop over to the Inkspired by Oak House Facebook page and put your cards in the borders and frames challenge folder.

As this block frame stamp has been so popular, and we have had so many wonderful cards from you lovely ladies, we are challenging you to show us what you make with this stamp, there is an album called 101 cards using the block stamp in the photo album section.  Make a card and post a picture in the album simple, you could also enter it in the frames and borders chalenge too.

Friday 17 October 2014

Christmas gifts - starting early lots to do!


Hi everyone,  Christmas seems to be coming as the weeks speed by and today I have a few Christmas makes for you.  Papermilldirect have an offer on smooth white card this week, ideal for these project as it cuts, stamps and colours beautifully.


Firstly I have an advent calender made with Papermilldirect smooth white, forest green, apple green, baize green (was on offer a few weeks ago), postbox red and Christmas red card.  This is an SVG file from SVG Cuts which was cut on the Silhouette Cameo.  After cutting I embossed the door panels with an assortment of Christmassy embossing folders to add some texture.


 Again traditional Christmas colours for this little gift box, which can also be used as a tree decoration.  The tree base was cut from Papermilldirect forest green card and various Christmas papers used to decorate, not sure who by as they were loose in my paper box.  Another cutting file from SVG Cuts.


One of my favorite colours for Christmas makes, this tree decoration was cut from Papermilldirect light turquoise card and decorated with patterned papers, crystals and ribbons.

Check out the other Papermill Design Team member's blogs to see what they have been up to this week:

Saturday 11 October 2014

Twinchie Christmas Card


Good evening friends, followers and passers bye, I have a Christmas themed post for you and a reminder that Oak House Studio held a mini one day "One Stamp" event today October 11th.  The stamp picked for this one stamp day was the fabulous Christmas Corner which comes in two sizes Large and Small.

For this Christmas card and tag I used the small Christmas Corner stamp, just the right size for twinchies.  The twinchies were cut out using Papermilldirect white hammer card (a 2" x 2" square) and the Christmas Corner stamped and embossed with Oak House Studio Seafoam White embossing powder.  I coloured the twinchies with a mix of  pigment inks in orchid and powder blue.  I tried out my new Inkilicious duster brushes dabbing the ink pads onto my craft mat and picking the ink up on the brush, it worked well and I was pleased with the finished effect.


Using a Papermilldirect white linen card blank I matted and layered the twinchies onto white linen and sky blue card placing the stamped images to form a pattern.  Finally I stamped the Christmas Blessings sentiment, again using a mix of orchid and powder blue pigment ink to match the colour on the twinchies.

A spare twinchie was added to white card to make a matching tag.  I think I will be going with blues and purples for my Christmas cards this year as everything I have done so far has been in these colours.

Don't forget to pop over to the Oak House Studi blog to see what the design team were up to today and leave them a few comments.  Comment before 12.00 tomorrow for the chance to be entered into a draw to win a fab prize.

Christmas Card Hanger and Fridge Magnet


Good morning all, Sylvia here with a One Stamp project.  Christmas is just around the corner and I always find I am short of space to display Christmas cards received, so here is a Christmas card holder which can be hung on a wall or a door for those extra cards you have no shelf space for.

The large Christmas Corner was coloured with bottled inks using a watercolour brush, glossy accents added to the berries and cut.  Any size pegs will do for this project, the bigger the peg the stronger it will be, I used the small pegs so they did not show and I will only be displaying thin cards.

Here are a few photographs showing how I put my card holder together.

 Stamp your chosen design onto smooth white card and cut out the stamped image

 Colour your cut out design with inks, or your chosen medium, add glossy accents or glitter to highlight areas of interest

Stick the pegs to the back of your coloured design with a strong glue and leave to dry

Thread string or ribbon through the spring on the peg, or simply fasten the clip and card to the string or ribbon to display your cards

By adding a magnet to the peg you can create a fridge magnet to add to a card as a gift, or to use yourself for those Christmas reminder notes.

Keep popping over to the Oak House Blog to see what the other design team members have been creating with the Christmas Corner, leave a comment and you could win a prize, and don't forget to let us see what you have been making too.

Friday 3 October 2014

Getting Ahead With Some Halloween Cards


Hello  to all my friends, followers and family popping in, today's post is a collection of Halloween cards, all of which have been made using Papermilldirect's latest offer which is A4 300gm back card.  You can get a small box for just £6.50, ideal for those Halloween and Bonfire Night cards.


These two quick cards were made with cutting files from the Silhouette store using Papermilldirect coloured card stock.  


Black, grey, orange, apple green and white Papermilldirect card.  The wording and images were cut on the Silhouette using cutting files from their store and SVG Cuts.  The backing paper is by My Mind's Eye called "Haunted" by Carina Gardner.

Check out the other Papermill Design Team member's blogs to see what they have been up to this week:


Wednesday 1 October 2014

Borders and Frames


October is here and so is a new challenge at Oak House Studio.The theme this month is Borders and Frames.  To enter visit the inkspiredbyoakhouestudio facebook page and add your entry to the competition folder.  Give us a like and if you are not a member yet why not join us.  

If you pop over to the Oak House Studio blog throughout the month you will find lots of inspiration from the design team. There are 5 fabulous prize of a £10 voucher to spend on Oak House Studio goodies, and a special prize of some of Lynnda's  stamps.  As long as you use one Oak House Studio stamp or ink on your creation you can enter, so come on ladies get those borders and frames cards made and entered.


This card was created using the very detailed sea shells and sea life stamps   I grouped the stamps to make a border and stamped them with sea blue pigment ink, washed a piece of corrugated card with white acrylic paint and stamped the crab using vermilion and a little yummy chocolate pigment ink and added these to the card.

There are lots of border stamps in the Oak House Studio shop but you can also make your own border or frame using other stamps as I did above.

Looking forward to seeing lots of your frames and borders creations this month.


Thursday 25 September 2014

Blue Christmas


Evening friends, followers and passers by, thank you for all your lovely comments on my last posts they are much appreciated.  Today I have a couple of Christmas cards using Papermilldirect white linen, teal and turquoise card.  There is a fabulous offer this week on forest green 160gm paper at Papermilldirect, £7.36 for a box of approximately 140 sheets, ideal for your Christmas crafting.


Two similar cards were made using Papermill light turquoise, teal and white linen card.  The shapes and snowflakes were cut on the Silhouette, stamped with a script stamp (not sure what make) and snowflake stamps and sentiments from Oak House Studio.  The cards were assembled reversing the colours, crystals added to the snowflakes and the sentiments stamped in sea blue pigment ink from Oak House Studio.


Check out what the rest of the Papermill Design Team have been up to below:

Tuesday 23 September 2014

Autumn Wedding


Hi everyone, don't forget you have until the end of the month to enter the Oak House Studio Autumn challenge.  There are 5 prizes of £10 each this month so more chances to win.  To enter visit the inkspiredbyoakhouestudio facebook page and add your entry to the competition folder.  Give us a like and if you are not a member yet why not join us.

Here is a set of autumnal wedding stationery using Oak House products.    Autumn is a beautiful time of year with the changing leaves and misty mornings, and such a lovely season for weddings.  I have been playing around with some ideas for autumn weddings, there are some super stamps in the shop which are ideal for wedding cards and invitations. I chose to use a leaf stamp from the Large Spring Blooms  stamp set coloured with Colour Chemistry Inks in citrus orange, lemon and lime with a little french mint thrown in.


 Table Stationery

I wanted a clean and simple look with a splash of autumn colour for this stationery.  An aperture was cut in the center of an ivory pearlecsent card blank and the center diagonal area of the card flicked with citrus lemon, orange, lime and french mint inks.  The leaf was coloured with inks using the same colours and attached in the center of the aperture on to the invitation insert.  The same theme was carried through the table stationery too.

Pop over to the Oak House Studio blog to see what the other DT members have been up to for this autumn challenge.

Thursday 18 September 2014

White Linen For A White Wedding


This week's offer at Papermilldirect is 10% off the normal price of their fabulous A5 white linen card.  

White linen is one of my favourite cards for wedding stationery and here are a few samples


White linen and silver embossing.  A card blank was made using white linen card and the invitation wording printed centrally on the front.  The Oak House Studio clematis corner stamp was stamped and embossed with silver detail embossing powder on a square of card and the aperture cut out using a craft knife.  This was centered over the wording and embellished with a matching ribbon. 

I make my own card blanks and this wallet card was made from an A4 sheet of linen card which I had half printed with a Pink Petticoat digital paper.  The butterfly was die cut from the cut away card using a Marianne die and a matching ribbon was fastened round the card.


The invitation has been attached to the card but could be placed with the other information and RSVP in the wallet.

Check out what the rest of the Design Team have been up to below: