Personalised Christmas Cards 2017

Friday 25 November 2016

Buff, black and white with a splash of red


Hi everyone, it has been a few weeks since I blogged life has been hectic and the time had just flown by.  Today I have a selection  of Christmas cards I have been working on using some of Papermilldirect's gorgeous new cards and papers, and some old favourites.

 
Check out Papermilldirect for 15% off this weekend, today through to Monday.


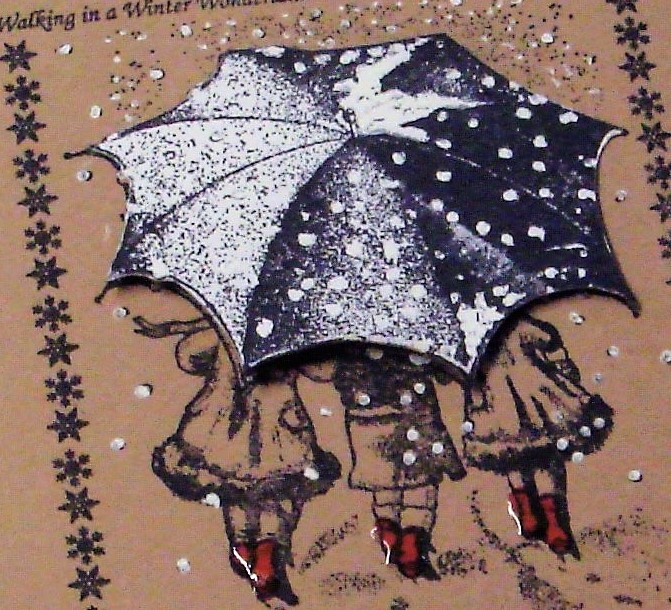
I just love the Crafty Individuals stamp used on the above card, so versatile.  I used buff card and white to stamp the 3D umbrella and added a splash of red highlighted with glossy accents.


I used Silver Sparkle card.  for the snowflakes on this card.  There are two holographic cards and the silver sparkle card on the Papermilldirect Special Offer page, fabulous for adding sparkle to Christmas cards.


Traditional colours on this card for Mum. buff, intensive red and  billiard green card teamed with white linen.  Stamped and heat embossed with stardust embossing powder.


A winter wedding invitation card and a lined envelope using natural white pearlised card and the new lustre print silver sea card and paper.  A quick and simple make using just a few stamps and dies.

How are you all getting on with you Christmas cards, have you finished them or still have them to do?  I have finished mine now so hope to get on with something different over the next few weeks.

Tuesday 25 October 2016

Working On My 2017 Create-A-Calendar


Hello friends, followers and passers by, a very short bog post from me today.  I have been working on some pages in my Papermilldirect Create-a-Calendar, having great fun with this, here are my January to April pages.


I have not done much crafting this week but hope to have a few Christmas cards for you next week, see  you then.

Saturday 15 October 2016

A Bright Birthday Card And A Few More Christmas Cards


Good morning followers and friends, today I have a bright birthday card made with Papermilldirect's new Neon papers which come in four zesty colours, a card to brighten up those dull dark winter days. 


The card blank was made from white linen card and the scribble die cut at the top of a white square which was layered onto 240 gsm sunflower coloured card.  Thinlits daisies were cut from the neon paper and attached to the white square.  The sentiment stamped in Memento London fog ink, I thought black would be too much but on reflection it would have made the colours pop even more.

I also have a few more Christmas cards to show you today using backgrounds created with distress ink and an acrylic block, my tutorial for creating the acrylic stamp block background can be found HERE. This is a quick easy way to create a background for any card.


The oblong panel was stamped onto pearlised card and the Santa panel was white linen textured card.  The pearlised card gives a smoother mix and a lovely pearly sheen through the colour but I do love the effect you get from the textured cards.  Papermilldirect now offer an array of colours in pearlised paper and cardstock, some really sparkly stuff too.

Still lots of Christmas cards to make, have you made all yours yet?  Love you to leave me a comment and let me know.

Sunday 9 October 2016

Halloween Tag and Treat Bag


Hello friends, followers and family, I am a little behind with my blogging this week.  Here is my Papermilldirect design team make, a fun gift bag and tag for Halloween.  I used Papermilldirect smooth white card for the tag and for stamping the crazy bird and attached the finished tag to a small craft coloured carrier bag.


The tag was cut using Sizix/Tim Holtz tag and bookplates die and was coloured with distress inks.  It was stamped with halloween stamps and stencilled before  adding a crazy bird coloured to look like Dracular.  The tag was layered onto Dark Violet card and Halloween coloured ribbons were plaited and added so it could be attached to a craft bag which was stencilled with purple, orange and green distress inks using a Tim Holtz Layering Stencil Halloween Script.

For some reason Blogger has been misbehaving this week, each time I start a blog post it suddenly publishes it, and I have to revert it back to draft.  Anyone else had this problem, or am I having one of those weeks?

Back soon with next week's DT make and a few pages from my Papermilldirect 2017 Create-a-Calendar which I have been working on.

Thursday 6 October 2016

A little Bit of Autumn and a few Christmas Cards


Hi everyone, today I have my weekly DT make for Papermilldirect, an Autumn card made using their new Hopsack Textured card.  The texture made me think of artist canvas and I will be using it to create a few wall hangings later in the month.  


I love Autumnal shades and used distress inks in various colours on a strip of Hopsack card , stamped a large leaf across the strip and embossed with copper embossing powder, mounted this onto a strip of Mocha Brown then onto a square of the white Hopsack card.  The panel was attached to a card blank made with the Mocha Brown card.  Suede cord was tied round and through a button and a sentiment added to finish.

Here are a few Christmas cards made this week, this is the time of year I start making my cards.  I usually make CAS cards which are easy to batch make but this year I have quite a few more fussy cards made.


I have a cute robin die and had to add it to this CAS buff and white card.


Colouring on textured card can be difficult, I used distress crayons to colour the robin and blended distress inks on the Autumn panel which filled the uneven surface wonderfully.

Thursday 29 September 2016

Butterfly tag and two spotlight cards


Good afternoon followers, friends and family popping in.  Today I have some butterfly cards and a tag made using Papermilldirect cardstock.  The tag showcases ivory coloured hemp textured card from the new range of textured card now available from Papermilldirect.


The ivory card was coloured and stencilled with distress inks, the sentiment and two die cut butterflies coloured with distress crayons were added.   The edges of the tag were blended with some distress ink and some gilding flakes added (does not show up well on the photo).  The tag was mounted onto black card.  The texture on the card is gorgeous, die cuts beautifully and took the distress inks and crayon well.


The following two cards were made using the spotlight technique, Papermilldirect white super smooth, black, new lilac and pastel canary card.


A tutorial for my spotlight cards can be found on the Papermilldirect blog.


Sunday 25 September 2016

One Stamp - Tea Bag Christmas Tree Tag


Good afternoon friends, followers and passers by.  This weekend I have been joining in the  One Stamp Event over at Oak House Studio.  I have been away for three weeks and couldn't wait to get back into my craft room. 

One of my One Stamp makes is this tea bag folded Christmas tree tag.  The stamp used this weekend is the Thoresby background stamp which comes in various sizes.  


The small Thorsby background stamps from the Texture Squares stamp set  is an ideal size for teabag folding and gave me the idea to make the Christmas tree.  I cut four different sized squares using dies and stamped them with the Thoresby stamps using the Thoresby Positive Square and Triple Meadow Green pigment ink pad .  The squares were folded and layered to form the tree.

The tag background was stamped with the Thoresby large background with clear embossing ink and heat embossed with clear embossing powder.  Sepia and Green Oak pigment inks were sparingly blended around the edge and over the tag.   I then stamped over the tag with Music Background, words from  the Deck The Hall stamp set, and the Snowflake Collection using Yummy Chocolate pigment ink.   The tag was layered onto Papermilldirect maroon card and a banner stamped with the Sending You Peace & Joy sentiment.

Pop over to the Oak House Studio blog and see more of my samples and some brilliant work from other members of the team.

Friday 9 September 2016

The Butterflies Count The months - Desk Calendar


Hello to followers old and new, friends and family, what happened to the weather?  Dull and miserable here so I have been colouring some bright butterflies.   Papermilldirect have their 2017 Create-A-Calendar available now and  I have been stamping and colouring in one myself.   As my mind was on calendars and such things I made up a small desk calendar for keeping track of important dates, I used a lovely selection of colours from Papermilldirect's new cards which come in a variety of thicknesses and wide range of colours from pastels to brights.
 

The base which creates the stand was made from a piece of white card 11.5cm x 29.5cm scored at the center point and 2cm either side.  The center score line was mountain folded and the two outer score lines were valley folded, this forms the standing base of the calender, the two ends were folded upwards and holes punched for binding or fastening with jump rings.  The outside of the base was covered with patterned paper and the wonderful quote and a little bit of colour was added to the butterflies.  The front cover and 12 pages were cut to 11.5cm x 12.5cmm.  The front cover was covered with patterned paper to match the base and all sheets were punched to match the standing base.


The pages were decorated and a monthly calendar added to each page. The cover and pages were bound onto the base with a wire binder.


Off now to make a few Christmas cards with some new stamps, see you soon.

Saturday 3 September 2016

Princess Party Invitation And Party Hat


Good afternoon followers, friends and passers-by, today I have a pumpkin coach invitation and a party hat using Papermilldirect's Special Offer flecked lilac card with raspberry pink and plain pink card.


Pretty pinks and lilacs are ideal for making party invitations for those little girls who want to be a princess.  I used Silhouette Store cutting files to create a card and party hat for a pretty princess party.  The invitation card base was cut from the flecked lilac, the pumpkin was cut from plain pink card and stamped with Lavinia Stamps vine stamp using clear embossing ink.  The pumpkin coach was layered onto an oval of raspberry pink card then onto the main lilac card. 


 I attached a crown to the inside of the card and printed out the invitation details on white paper.  The fleck effect in the lilac card can be seen in the photograph below, it is such a beautiful card.


The princess hat was a mixture of two cutting files,  the hat was assembled using the rosette and the crown from the lever card was used to decorate the rosette. Three ribbons were threaded through the top of the hat and thin ribbon ties attached to the base.
  

The different elements from the three cutting files could be used to create cake toppers, decorate party bags, make banners or bunting and place cards for the princess guests.  The cutting files used were Princess Party Hat - Lori Whitlock,  Princess Carriage Card - Studioilustrado and Princess Lever Card - Jamie Cripps.

Saturday 27 August 2016

Keeping Memories and Back To School


Good afternoon friends and followers old and new.  Last week I made a Smash Book using  Papermilldirect's extra thick black 550gsm card for the book covers and lots of different coloured card for my inserts. You can find my tutorial for making this simple ring bound smash book on the Papermilldirect blog HERE.   

As a child (many years ago!) I remember receiving a Victorian type scrapbook with stickers and other items to add to it.  It was fun sticking things into the scrapbook and adding some details about them throughout the year. A smash book reminds me of this old fashioned type of scrapbooking, it is something you can fill with interesting things you pick up, ideas you have, write about interesting places you have been and things you have seen, or a place to try out crafty techniques, stamps, doodling and colouring.


The header picture shows  my simple version of a smash book which I fastened with a card button and some elastic, a note book to carry with me and a bound smash book.  I used the 500gsm card for making the bound smash book too it is an ideal weight for making a firm cover and strong spine, the hinge to hold the wire binding was made from 300gsm smooth white card.  There are many tutorials for the bound smash book on the internet if you want see how they are made.


This week we have a Back To School theme over on the Papermilldirect blog.  Here is my Design Team make, a timetable clipboard and tag made with the white 550gsm thick card and black, red, blue and white card for the layering and tag.  

I used three sheets of 550gsm white card glued together to make the clipboard and layered Post Box Red and special offer Azure Blue card on top.  250gsm Smooth White, Black, Post Box Red and special offer Azure Blue card were used for the gift tag.  The gift tag was cut on the Silhouette using a Lori whitlock cutting file "Back To School Phrase".


The timetable was created in Page Plus, a desk top publishing programme, but you could use any word processing programme.  I clipped the timetable to the board with a large bulldog clip ready for filling in and attached a ruled pad to the back of the board for making notes.  The 580gsm card made a strong base for the clip board and the smooth white card printed beautifully on my new ink jet printer.

Pop over to the Papermilldirect shop to see the new range of coloured cards added recently, there are some fabulous new colours.  Don't forget to check out Mypaperwarehouse Papermill's sister company too for back to school supplies as well as craft supplies and stamp.

Have a lovely Bank Holiday Weekend - see you next week xx

Friday 19 August 2016

Take 5 - Playing With Words And Inky Flowers


Hi everyone, another month and another Take 5 Challenge, this month's theme is WORDS.  I have an inky card for you today using some bright colours and my favourite daisy stamp from the double daisy stamp set.  I used stamping card for the coloured and stamped panel which was matted onto papermilldirect black and post box red card before attaching to a white linen card blank.  


The stamping card was cut in a square 14cm x 14cm and coloured with drops of pure colour chemistry ink which were left a while them rolled over with a kitchem roll to spread out the ink and remove any excess.  I overstamped the English garden words in grey pigment ink and stamped the daisy in black over the colour splodges touching up the petals that did not have any colour.  The sentiment was stamped in black over the garden words but the impression was poor so I stamped it on a piece of card, making sure I stamped the garden word in the right place to match the original and placed it over my mistake.   I used black Archival ink for the flower and sentiment as this is waterprooof when dry allowing me to colour the petals without smudging.  


I always add an insert to my cards and this was stamped and coloured the same as the front with the daisy.

Are you joining us for this month's challenge? there are plenty of sentiment stamps available in the Oak House Shop pop over and take a look, I'm sure we will see quite a few of them over the month in the Take 5 Challenge blog posts.